|
|
|
I have to rework this page. I tried this out before I fried the engine, and it worked very well. But at that time I had located the strings much lower on the vertical/slab sides of the windshield. While waiting for engine parts, I worked on the scales below, and I mounted the strings much higher because I thought I could see them much better. It wasn't until I started flying again, I realized that the indicator strings were not working as before. Then I figured out what I had done. By moving the strings up so that I could see them better, I had moved the attachment point up on the beginning of the round of the windshield. This made them very insensitive to angle of attack. When the weather clears and warms, I will put the strings back down where they were originally, check out the system, and I will report the correct position. My apologies to anyone who tried this and it did not work for you. This AOA indicator should work well on all Kolbs that use the small nose cones. It is simple, inexpensive, and weighs less than an ounce.
To locate the string indicators, a small hole was drilled through the windshield one inch back from the instrument panel and up ten inches from the upper longeron. Woven fish line was fed through the hole from the outside and knotted on the inside. The line was pulled back horizontal along the windshield and cut so it was even with the windshield trailing edge. Another knot was tied as close to the cut end as possible. This photo shows an early version with the paper scale taped to the windshield.
|
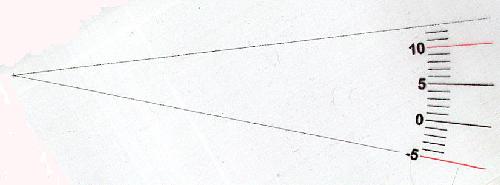 An incline meter was used to measure the bottom wing front to back surface angle to the horizontal, and it was found to be thirteen degrees. So from the top line to the zero line is thirteen degrees. Then I selected plus and minus five and plus ten degree lines. The minus five and plus ten degree lines were printed in red to warn of exceeding the never exceed speed and possible stall conditions for the FireFly. The scales were copied on overhead projection sheets at Staples.
 To attach the scale one just first cut the excess material away from the scale. Also cut off a little of the cross and point so that one can accurately place the scale relative to the hole an on the inside of the windshield. The nice part about using the transparency is that it holds static charge well, so if one rubs it a little with some flannel, it will stick to the windshield. Next use an incline meter to measure the bottom wing surface slope from front to back. Rotate the transparency until the zero line matches the same angle as you measured. To be sure you are on the line, you can hold the string in the zero position and then hold up and sight the incline meter to see if the reading is correct. Keep adjusting the scale until it is on the mark. Place a little piece of clear tape over the tip and the back of the scale to hold it in place. Go fly and see how it works. If you like it you can carefully lift the point end loose and cut it away leaving the scale end in place. Then cut a piece of clear packaging tape and place it over the scale to hold the scale permanently in place. If you would like a set of these scales, see below and you can print out a full sized set of scales. Take it Staples and it will cost about $2.00 to get a transparency made. Down Load MicroSoft Word files (*.doc) - 300+k |
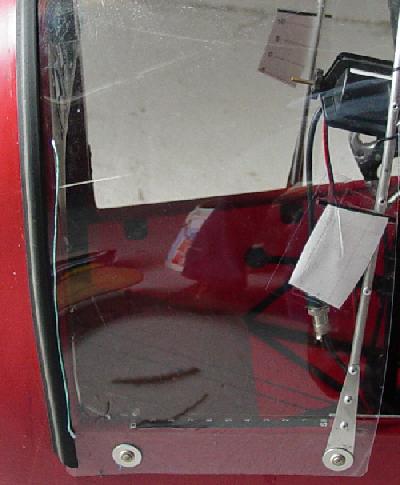 My first attack meter was OK for a few tests, but it was too complicated and not rugged enough for every day flying. Also something more in the direct path of vision would be much more useful. Since the windshield is clear and the air passes by on each side, I tried some woven fish line indicators, one on each side of the windshield. They seemed to be stable in flight and so I added a paper scale on the windshield to tell me the wing angle of attack.